Hey everyone, in this post I give you a quick step by step guide to install SSL certificate on your website. If you follow this process carefully, your website will go from http to https in 10 minutes or less. The best part is, you will pay nothing!
SSLFORFREE.com, the website I have been using for free SSL certificate has now partnered with ZEROSSL.com. So, the process of renewing, generating and installing the free SSL cert has changed a bit. If you have been the using sslforfree.com, now you won’t be able to apply the procedure you used earlier to renew the cert.
You will need to follow the below mentioned steps to generate a free cert.

How to get a free ssl certificate with ZeroSSL?
To follow the process, please make sure you have the hosting login and password with you. I use Godaddy Cpanel hosting in this process. Shouldn’t be a problem if you use other hosting companies. As long as you have the access to backend, you will be good to go. So, here’s what you need to do:
- Go To ZEROSSL.com if you are doing this for the first time.
- (For Old Users) Old users, who are looking to renew SSL certs should go to sslforfree.com and login. Now, paste your domain name in the field where it says, “Enter Website to Secure”, click on create free ssl certificate. This will redirect you to ZEROSSL.com interface, and your login credentials stay the same
- Now, both new and old users need to follow the same process. As none of the previous certificate data shows up on zerossl. So, you need to create a new SSL Certficate
- Click on New Certificate and on next screen enter domain name
- Choose Validity, for Free Cert, click on 90 day certificate and hit next
- CSR & Contact, i will keep it toggled on and hit next step
- You will see the free plan automatically selected for you, hit next step
- At this point, you will see “Your certificate has been created and is ready for domain verification” message popping up, this means your ssl cert is created
- Next step is to verify the domain ownership
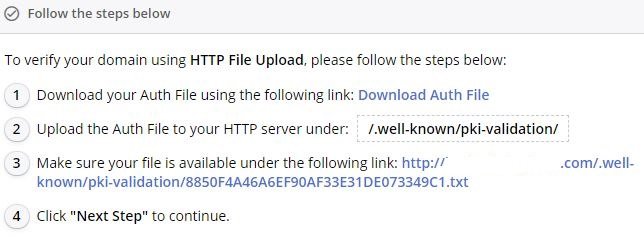
- Choose the method you find best. I prefer http upload, click on that and you will see these steps:

At this point please login to your hosting panel
Follow these steps when you are inside your hosting panel.
- First download the auth file on your computer
- Now, go to the domain root and make a folder with name “.well-known” this folder should exist for old users already
- Now, create a sub folder inside .well-known. Name that folder to ” pki-validation”
- Inside “pki-validation” folder upload the auth file
- Now, follow the 3rd step and click on the url, this is done to check if the file is uploaded successfully. If the file is uploaded successfully, you will see a code on a black screen in new window. Now hit, next step
- Now, ZEROSSL.com starts generating the CSR, CABundle and Private Key details for the SSL cert. This may take some time, so be patient
- Once, these files are generated, you are asked to download them. It is a zip file. Download it and unzip on your computer.
- Now, go back to your hosting panel, find SSL/TLS if you are on CPanel.
- Inside SSL/TLS, click on manage SSL sites.
- Now select the website, click on update certificate.
- Three blank fields will show up, just extract the info from the files we unzipped, and paste them in relevant fields
- Now, hit save
That is all you need to do! Now go ahead and open your website in browser and see it running with an https enabled.
Watch this video of me installing free SSL cert on my website
If the above step by step guide is not clear to you, consider watching the following video I created recently. This will help you immensely.
Use this tutorial for Hostinger hPanel
If you use Hostinger web hosting, consider using this video tutorial to install the SSL cert on your website. Watch the video carefully, each step in the video is important.
If you have any questions, please feel free to send your tweets at @topitguy. I will be more than happy to assist.